Monday, April 1, 2024

Crazy Quilt Journal Project 2024..... February Block

I'm a bit behind with my blocks as I did a stupid thing and burnt the thumb and index finger of my left hand. I never noticed that I used those two fingers as much when I did hand work. Like tying knots. Sheesh. 

Anyway 😀

February block...the second horoscope sign.....done!! 

Taurus: The Bull

Colour: Green

Element: Earth


Take care.


Friday, March 8, 2024

Crazy Quilt Journal Project 2024.....January Block

Last post I showed you my hexagon idea which was actually plan B. I did do a bit of stitching on it but then I thought....nah. Each seam is 3 inches (7.62 cms) which is not a lot of space to work with.

I did have a Plan A but it was discarded almost immediately. The picture of the Aries image in the middle didn't really work. 


Plan C finished. Aries: The Ram. Colour: Red. Element: Fire. On to my February entry. Stay tuned.


Take care :) 


Friday, February 2, 2024

Crazy Quilt Journal Project 2024 - January Part Deux.....Fixed......

I originally had to put the image into a circle of the same fabric because it was too small to fit into the middle of the hexagon. Very fiddly and me being lazy. 

I reprinted the image and I think this time it's straight. My dad was an Aries and I think he must have been looking over my shoulder and telling me it was shoddy work 😀 Hopefully he will now let me get on with it. 


Take care :) 


Thursday, February 1, 2024

Crazy Quilt Journal Project 2024....January

I decided to use as my theme for 2024 some zodiac signs I have. They are for card making and scrap booking. I printed them on fabric using freezer paper. 

The first sign is Aries, the Ram. Colour red. Element fire.

Sounds good right? 

I have made three attempts to put the sign into a block. I tried the traditional square block and then a circle but somehow I didn't like the look. Then I thought I'd do a hexagon. I very carefully constructed it. All sewn by hand using the English Paper Piecing method. A lot of time and work. 

Then I decided to take a picture. Arggghhhh!!!!!

Can you see what's wrong? Look at the printing on the image. It is very slightly off centre. I cannot believe it. I know I lined it up and pinned it before I sewed it in place.  It's a good thing I noticed before I started stitching.  

Maybe the fates are telling me not to do this theme. 


Wednesday, December 20, 2023

Crazy Quilt Journal Project 2024......

A new blog has been created for the 2024 Crazy Quilt Journal Project. 

Here is the link.......https://cqjp2024.blogspot.com

And, of course there is the existing Facebook page.

https://www.facebook.com/groups/287852761834560

I have no idea what I'll do this time around. It was hearts in 2022. Hmmm.

I'm looking forward to participating again as it gives me incentive to create. Last year it was very quiet in my sewing room.

Take care.

p.s. Santa is still at the Tate workshop. Will he be seen by Christmas day? He's a bit miffed with me at the moment and isn't cooperating. I'm probably on his Bad List. Underlined twice. 

Monday, December 11, 2023

Christmas stars.......

Someone posted this video on one of the FB groups I belong to. Christmas stars for your tree.


Thursday, December 7, 2023

Santa is almost coming to town........

So I'm moving my doll making over here to this blog. 

Reposted from November 23, 2022. Yes you read right 2022.  I thought I'd start at the beginning. 

My husband has been asking me to make a Santa Claus for a couple of years but not the Coca Cola version. I bought a pattern called Old World Santa by Deanna Hogan of Blue Heron Dolls that seemed to fit the request. I checked and I bought it in 2007. 

To say that I'm really enthusiastic about making a Santa doll would be a lie. I wasn't when he first suggested it and I'm still not. I started it last year in November 2022 and now it's December 2023 and I have gone back to finish it. 

If you go to the link you'll see that there are two versions. I'm making the Santa wearing pants rather than the long robe. 

It's made with craft velour or doe suede which I normally don't use. My favourite fabric is Kona cotton. 

You see those zig zag lines on all the body pieces? The directions on this pattern are......."Follow the grain and stretch lines indicated on the pattern pieces.....the zig zag line indicates the cross grain (with the most stretch, perpendicular to the selvedge." That really confused me so I had to Google to make sure I understood what cross grain meant. 

So the pattern pieces are cut perpendicular to the selvedge? 

Most doll heads made in cotton are cut on the bias and not the cross grain and the body parts on the straight grain which runs parallel to the selvedge.  

As you can see in the pic above I pasted the pattern pieces to cardboard as it's much easier to trace when the pattern uses the freezer paper method. I have a really old Singer sewing machine that I use as I have a "custom" machine foot for doll making. It was a plastic foot that I never used and I took out the middle bit with cutters. Makes it easier to see the seams on the freezer paper specially when sewing those little fingers. And....you can see that the pieces are perpendicular to the selvedge. 

This is a standing Santa but this doll pattern doesn't have an armature. I have made standing dolls before without and they do stand for awhile but eventually the stuffing settles and the legs lose firmness. You can fix that by opening the legs and putting in more stuffing but I'd rather not. 

I have the body put together and it's standing. I put wooden skewers up through the feet and legs on into the body. The legs are very firmly stuffed. I plan to put Santa on a wooden base and the wooden skewers will be glued into that base to support him. 


I've picked up a few tricks over the years when making dolls. After you have inserted the pipe cleaner into the doll's fingers it helps to clamp them with a hemostat. Why? That way when you are wrapping the pipe cleaners together with tape or thread or whatever method you choose to secure them they stay in place.  Otherwise they move about in the hand and you have to keep resetting them into the fingers. Hope that makes sense.

This is where I got to last year. Now I have to make the head. I think there may be a few swear words. 

I will be back before December 2024. Stay tuned 😀


Tuesday, December 5, 2023

Question?????

I was wondering if anyone would mind if I posted about my doll making on this page. By that I mean the how to's and process and so forth and of course the final product. 

I do have a sort of blog for doll making but I only have 4 followers and it gets lonely over there 😀


Sunday, March 26, 2023

Messing about......

I haven't posted in ages as I haven't been up to much.  I've spent the winter months hibernating doing genealogy mostly. 

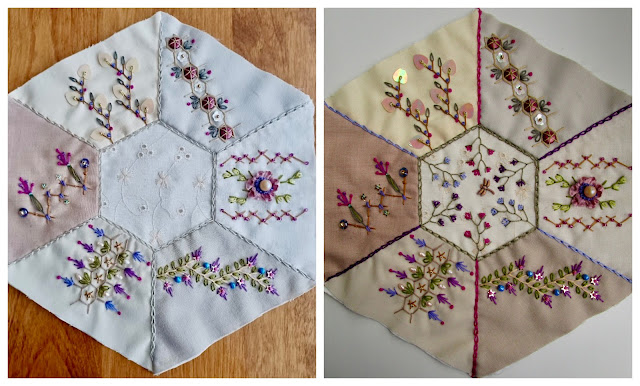
I did do a bit of sewing. I posted way back when about redoing a block. Here is the before and after then.

I framed it to use as a page in a soft book. It really brought out the colours. 


I've taken a lot of little bits of embroidery work and turned them into pages as well. I figure I might as well do something with them rather than sticking them in a drawer. 

I'll post about them another day.

Take care 😀


Friday, November 4, 2022

CQJP2022....The Book......A Comedy of Errors......

When I set out to do this project I had no idea what the outcome would be. The rules said that the participants were to complete a 6-inch or larger crazy quilt block each month. 

I made mine 10 1/2 by 11 1/2 because I wanted to do the hearts and six inches didn't give me enough area to work on. The hearts themselves are 8 by 8 1/2. Now my first mistake was not making my background block larger and second not finishing the edges. The fabric I used frayed a lot.  My background blocks slowly lost their square shape. But I plodded on.

I soon realized that a wall hanging was not going to happen as the colours I used in each "block" didn't really all blend well together. So I decided since it was the Crazy Quilt Journal project that I would make a book.

My first plan was to add a matching piece of fabric for the back of the block and use that to bind the edges. It worked for my wall hanging but for a book it was a bit floppy. So I decided to add a layer of thin felt between the block and backing. It sounded like a good idea. 

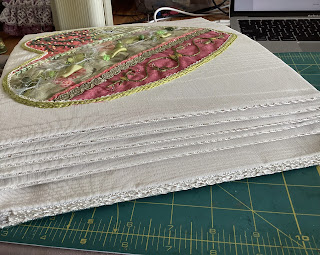
Thankfully before I started to sew all this together I gathered my stuff and I piled it up to see how thick this "book" would be. It was massive and it soon became apparent that the hearts created a mound in the middle and the edges drooped. Pretty ugly. 

Plan B.

I sewed one block to a backing fabric and make a square pillow. I then cut a piece of thin cardboard to fit (I used cardboard from file folders that I had at hand) and inserted it into the pillow or pocket or whatever you want to call it 😀 UGLY!!! 

Plan C.

I unpicked my pillow and glued the edges only of the block to the cardboard...see pic.  I used Aleene's Original Tacky Glue. From my experience it's the best to use with fabric because of it's tackiness and it dries very fast.

Then I cut a second cardboard and glued the edges of the backing fabric to that. My plan was to sew both together using pearl cotton. The problem was I did such a good job stretching and gluing the fabric edges flat to the back of the cardboard that it was difficult to sew together. I had no leeway without bending the cardboard which I didn't want to do. 

Also this really screwed up my plan to sew the boards together at the spine side to make a book. In the end I decided to glue both pieces of cardboard together.

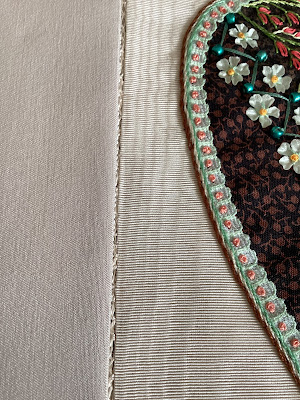
But before I did the gluing I had to figure out a way to sew my pages together. I had some tape in my stash that I've had for eons and luckily I had just enough. I cut the lengths I needed the did a blanket stitch along one edge. I then glued this tape to one of the cardboard sides. This gave me "loops" to sew the pages together. 

I then glued the block and it's backing together to make one page. Here are some of the pages finished. 


I wasn't all that happy when the pages opened though. Because each page is thick you could see the binding stitching. 


I continued with sewing the pages together but the end product wasn't really that great. The edges at the corners of the pages were thicker than the middle and there was no way to pull them tight and flat. 


Hmmmm. 

So I then unpicked all my stitching and then joined the pages together with ribbon and lace. That seemed to work. I used what I had at hand and tried to match it as best as I could to the hearts. 


I did end up dying some white lace and rickrack for the last three pages. 


I used Dye-na-flow by Jacquard. I buy the starter kit and mix the colours to get the colour I need. You use a few drops in a small amount of water and you can get great results. 


Here is the back using the ribbon to join the pages. I now have to figure out how to cover the back. 


The book so far. 

Added: I managed to make an end piece using the last scrap of my cover fabric. I had to use it on the bias and had just enough. I glued it to a piece of unbleached cotton for some stability. 


Done!!!!

Take care :) 

Monday, October 31, 2022

Happy Halloween........


Some dolls made for past Halloween challenges. 

We were given a primitive pumpkin pattern in three sizes and we had to make something with it. I made a doll using the smallest pumpkin for her head. 


.............................................................................................................................


Goodie Witch

.............................................................................................................................


The Corpse Bride

Take care :) 

Saturday, October 15, 2022

Crazy Quilt Journal Project....Block 11 and 12

So technically I have finished the CQJP2022. Next I have to do something with my blocks and not a wall hanging.  

Not a great day to take pictures. I usually take them outside on a dull day. My son who works in the photography/film industry tells me this is the best natural light. Today was way too windy.  I considered taping them down but decided that was nuts 😀


On another topic......here is some eye candy. One of my favourite doll makers is Arley Berryhill. Sometimes he makes other stuff.  His wall hanging called Magic Scales is really beautiful.  Lots of embellishment with lace and beads and buttons. 

Magic Scales


Take care 😀